

Falling Sakura Book Nook Lights: DIY Shelf Scene

Falling Sakura Book Nook with Lights – a calm little scene for your shelf
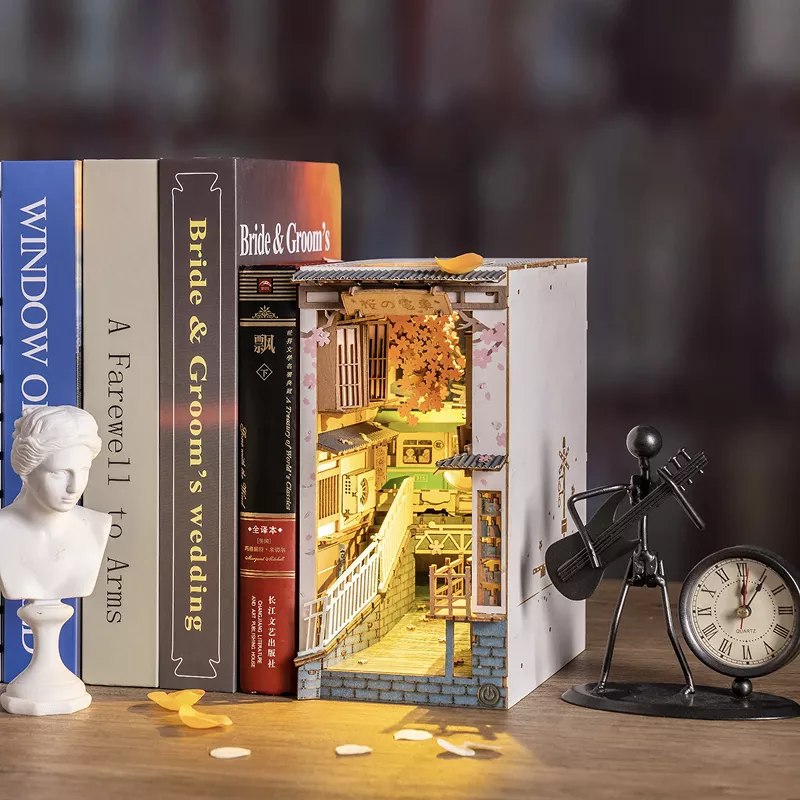
Add a soft, storybook glow between your favorite titles with the Falling Sakura Book Nook with Lights – DIY Wooden Bookend Decoration. Our team designed this DIY wooden bookend decoration to turn an ordinary row of books into a small, illuminated “pause”—a cozy detail that feels right at home on a nightstand shelf, in a reading corner, or as a gift for someone who enjoys mindful crafting.
Cherry blossom themes are often associated with quiet beauty and fleeting moments; if you enjoy the meaning behind sakura, Smithsonian Magazine has a thoughtful overview of why cherry blossoms are important in Japan. This nook channels that calming mood into a shelf-sized project you can build at your own pace.
What this book nook adds to a bookshelf
A book nook works like a tiny set placed between book spines—more scene than statue, more atmosphere than clutter. The Falling Sakura nook is built to feel intentional on a shelf, not like something that needs an entire tabletop to “make sense.”
- Creates a lit “in-between” moment on the shelf, like a tiny alley of light nestled among spines.
- Sakura-inspired atmosphere that pairs beautifully with fiction shelves, journals, manga, or minimalist decor.
- DIY build experience that’s as enjoyable as the finished display—ideal for slow weekends or an evening craft session.
- Bookend-style decor that upgrades a shelf without needing wall space or a large footprint.
At-a-glance details
| Detail | What to expect |
|---|---|
| Product | Falling Sakura Book Nook with Lights – DIY Wooden Bookend Decoration |
| Type | DIY wooden book nook / bookend-style shelf insert |
| Lighting | Built-in lighted effect for a warm shelf accent |
| Price | 35.51 USD |
| Availability | In stock |
| Current stock | 182 |
Who it’s made for
- Readers who want a gentle glow near their books without changing the whole room lighting.
- DIY and model-building fans who enjoy careful assembly and small decorative details.
- Gift buyers looking for something more memorable than standard decor (great for birthdays, housewarmings, and holidays).
- Collectors of miniatures, shelf scenes, and desk decor that feels personal and story-driven.
If you’re giving it as a gift, it lands especially well for anyone who likes projects with a clear finish line: build it, place it, enjoy it nightly.
What’s included and what to prepare before you start
- DIY wooden components designed to assemble into a book-nook-style insert.
- Integrated lighting element intended to illuminate the scene once assembled.
- Before starting: clear a well-lit workspace, keep small containers for parts, and set aside uninterrupted build time.
- Helpful tools to have on hand: craft glue (if required by the kit), tweezers for small pieces, and a small file or sandpaper for minor fitting adjustments.
- A simple build habit that helps: dry-fit pieces first, then secure them—this keeps alignment clean and reduces rework.
For general safety habits around consumer products (especially anything with small parts or electrical components), you can also review guidance from the U.S. Consumer Product Safety Commission (CPSC).
A simple build flow (so the project stays relaxing)
We like a build process that keeps the calm vibe intact—no rushing, no “where did that tiny piece go?” chaos. Here’s a steady approach you can follow.
- Sort and identify parts: lay pieces out in groups (frames, panels, decorative elements, lighting components).
- Assemble the main structure first: focus on keeping corners square so the nook slides neatly between books.
- Add the scene layers: build depth gradually—back elements first, then mid layers, then the front framing.
- Install lighting thoughtfully: test placement before final securing so the glow spreads evenly across the scene.
- Finish and set: allow any adhesive to fully cure before placing the nook on a shelf to avoid shifting and stress on joints.
A small rhythm that helps: do one “precision” step (small details) and then one “structure” step (larger pieces). It keeps your focus fresh and reduces mistakes from fatigue.
Lighting and placement tips for the best shelf effect
- Place the book nook where it can “borrow” a little ambient light by day and become the focal point at night.
- For a stronger contrast, position it between darker book spines; for a softer look, pair it with pastel or neutral spines.
- Keep it away from direct heat sources to protect wood and lighting components.
- If styling a reading corner: echo the warm tone with a nearby lamp, light-colored bookmark, or a small plant for a calm, cohesive setup.
If your shelf is tightly packed, leave a little breathing room on each side so you can slide the nook out without rubbing delicate edges.
Gifting ideas that feel intentional
Care and long-term enjoyment
More in-stock finds from our shop
FAQ
Is the Falling Sakura book nook suitable for beginners?
It’s a DIY wooden assembly project, so a calm pace helps. Start by organizing the parts first, dry-fitting pieces before securing them, and using simple tools like tweezers to make small placements easier.
How do the lights affect the final look on the shelf?
The lighting adds depth and turns the nook into a warm focal point, especially in the evening. Test the light placement before final securing so the glow spreads evenly across the scene.
Where should it be placed for the best display?
Place it on a stable shelf, away from heat and moisture, where it can be enjoyed daily—like a bedside shelf, a reading corner, or between volumes of a favorite series. Styling it between contrasting book spines can make the scene stand out even more.














Leave a comment